WordPress is a free, open-source content management system (CMS) that allows users to create and manage websites and blogs. It’s a popular tool for people without coding experience and can be used to build various websites.
You will begin by installing or verifying you have installed the Synology packages below.


Next, navigate to the File Station > web folder.
Right-Click the web folder and select Properties.

Select the Permission tab, then select http, then click the “Edit” button.

Make sure Read and Write are selected, then click “Done”.

Click the “Save” button to continue.
Now, create a new folder in the web folder. We ended up calling our folder website; however, you can name it anything you want for identification purposes.
Go to the WordPress download website and download the latest version of WordPress. Then, upload this zip file to your Synology NAS in the folder you just created for your website.

Next, Right-click the zip and select Extract > Extract Here to continue.

You can move the files inside the WordPress folder into your website folder or leave them where they are. You can also delete the WordPress zip file now if you want as well.

In our case we move the files to the website folder and deleted the WordPress folder.

Find the wp-config-sample.php file in the main website folder and rename it by right-clicking it and selecting rename. Once this is done you will name it wp-config.php.


Next you will double click the wp-config.php file which will open the file into the Text Editor app. You will scroll to the bottom of the configuration and find the “/* Add any custom values between this line and the “stop editing”…” line in the code.

You will add the code below to the section as shown above. This will open SFTP and help solve plugin installation and activation issues.
//*The next line allows direct downloads/
define('FS_METHOD', 'direct');
Go to the WordPress salt generator and copy the code generated to place it in your wp-config.php file.

The salt-generated code will replace the default code, as shown below.

When this is completed, it should look like what is shown below.

Scroll up again until you find the database information in the configuration. Fill out the information here before you set up your database.

This is an excellent place to reference if you forget the website’s database, username, and password for that database reference. You will need this information later.

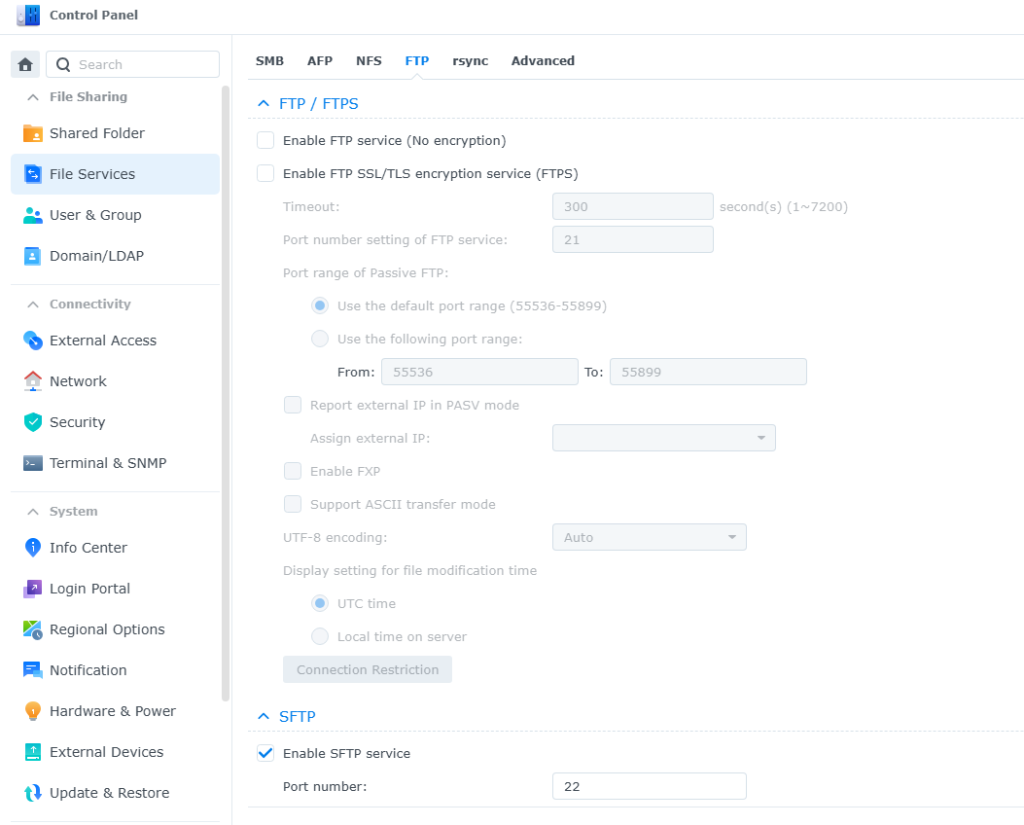
Open the Control Panel > File Services > FTP tab. Navigate down and make sure to check Enable SFTP service. You can change the port if you like. Make sure to click “Apply” so the settings for this page are saved.

If you ever forget your MariaDB root password, you can reset or change it by clicking the MariaDB 10 app. This is a nice feature to prevent yourself from being locked out of your database.

Next, open the phpMyAdmin app. This only works with DDNS and direct IP connections, Synology QuickConnect will not work for this application. Your username is root, and your password is the MariaDB password.

Once logged in, you will select the” “New” database button at the top left.

Next, set the database name to what you put in the wp-config.php file. Once you’ve done this, click the”Create” button to continue.

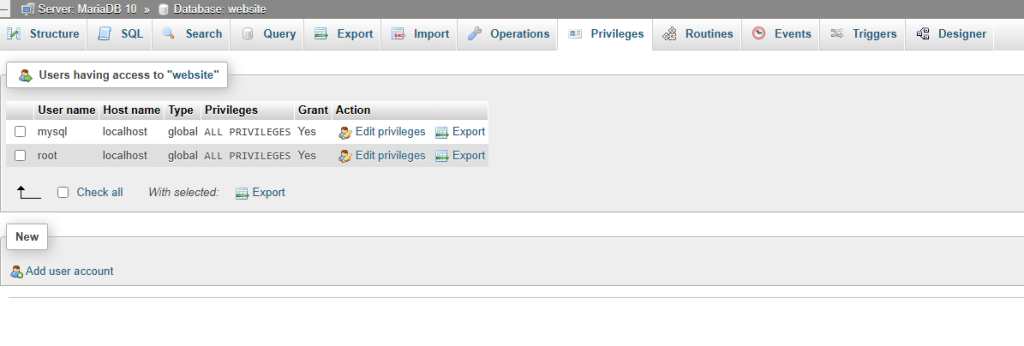
This will open the database you just created. Navigate to the “Privileges” tab and select “Add user account” under the “New” section, as shown below.

Next, you will configure the username and password for this user account from what you put in the wp-config.php file. Once done scroll down and click the “Go” button to finish.
You can close the
Once done you may close out of phpMyAdmin app. Make sure your wp-config.php is saved before closing the Text Editor app.

Next, make sure to set up port forwarding for the ports below on your router or firewall. However, Port 22 is optional, as your essential plugins might not require it. If enabled, make sure to update your Synology NAS firewall.
SFTP
Port 22 TCP (Only enable if required)
HTTP/HTTPS
Port 80 TCP
Port 443 TCP
If you are utilizing a web domain, make sure to update your DNS records for proper routing for your website. Remember that DNS updates can take up to 72 hours.
If you will be utilizing DDNS, we recommend using the Synology DDNS and setting it up for website use.
Next, open the Web Station app, then navigate to the Script Language Settings tab. From here you will select PHP 8.2 from the list and click the “Edit” button to continue.

On the settings tab make sure that “Enable PHP cache” is checked.
On the Extensions tab make sure to check the following: curl, exif, ftp, gd, gettext, iconv, MySqli, OpenSSL, posix, soap, sockets, and zip. Depending on plugin installation, you may need more than these selected later.

On the Core tab, find the upload_max_filesize and ensure it is set to at least 40M. Once you’ve done this, click the “Save” button to continue.

Next, in the Web Service tab, click on the “Create” button. You will select the “Native script language website,” then click “Next” to continue.

Complete the form while also selecting Apache for the backend and your document root will be whatever folder you created in the web. The only difference is if you kept the WordPress folder you will need to select it after your website folder link.
** Example web/website or web/website/wordpress **

Verify the options and click the “Create” button to continue.

Navigate to the web portal tab and click the “Create” button. You will then have the option to click the “Web service portal” button to set up your website.

Select the service you created earlier and complete the form. Make sure you check the “80/443,” “HSTS,” and “Enable access logs” boxes. Click the “Create” button when you are ready to continue.


If you are utilizing the Synology DDNS this next section doesn’t apply to you.
If you are utilizing a third-party DDNS or a domain, complete your certificate request as shown in this post.
Once this is done, navigate to your WordPress website address and see the following pages. Remember that these are public to the internet, so setting up the WordPress credentials is time-sensitive.


Conclusion
Hosting one or more WordPress sites on a Synology NAS can be productive and cost-effective for individuals and small businesses. By utilizing your NAS, you gain complete control over your website infrastructure, eliminating the need for expensive third-party hosting services. This setup allows for scalability, customization, and access to your data in a secure, private environment. Synology’s user-friendly DSM platform simplifies WordPress installation and management, while its built-in backup and security features provide added peace of mind. Overall, hosting WordPress on a Synology NAS maximizes resource efficiency, reduces ongoing costs, and offers flexibility for managing multiple sites.
Leave a Reply
You must be logged in to post a comment.